Friday, February 29, 2008

What to do with old boxes? Toys, light box? Bigib is going green...


I have been preaching my daughter about recycling. Not only putting the recyclable items into our recycling bin, but also to think about recycling items for different uses.

Last week, I helped her make a kiddy purse. The idea comes from Market Day.
It's very simple. Just find an old sturdy box. Flip it inside out, put a knotted end ribbon in between the flaps. Or if there's no flaps, make a knot and tape it on the side. Finally, let her decorate. She's so proud with her purse. She even take the purse to the church. She's happy because she has activity to decorate the purse while we are happy to have a quite service...

Other than making it into kiddy purse, there are several ideas including using the flip inside out box for storage, make kids building blocks toys and may be a cheap light box?


Here's an idea by lollygirl that uses old box to make your own light box

What's your idea for recycling?

Thursday, February 28, 2008

Dare to be different...


Does a necklace has to be symmetry? I'm challenged to make something asymmetry but still able to keep the balance. What do you think?

Wednesday, February 27, 2008

Nursing Bracelet for Miss CM's friend.


Ms. CM ordered one numberless nursing/breastfeeding reminder bracelet in Ruby color, for her friend who is having a baby in July. I'm so excited to see how the bracelet turned out.
Wouldn't you agree?

Tuesday, February 26, 2008

How to make Mindy's "sprout" necklace.


I'm a WIST-etsy member. Last year we had "Christmas in July" gift exchange. When I got Mindy's name, I felt so anxious. What can I make for fellow jeweler?
So, here's what I made. A sprout necklace. It's made from sterling silver wire, balled on both ends and twisted. I used torch to ball both ends of the wire and then pickled and cleaned the wire.
Because her favorite color is blue, I add turquoise for her blue color. That's the tricky part as you can't pickle Turquoise. So, I have to individually hold with my hand for a few minutes. To keep the "fringe" centered, I used the cable tension idea. If you look closely, it's actually two cables that pull each other, so the focal point with always centered.

Monday, February 25, 2008

Friday, February 22, 2008

Why do I make jewelry? The love of dreaming ideas and making it happen.

"What do you want to be when you grown up..."
That's what my mom asked when I was just a teenager.
"I want to be an Architect, so I can build a house for you", I answered.

People may think I'm a bit out of ordinary. With a Bachelor in Architecture, I should work in an architecture firm or a construction company.
Yes, I did work in Architecture world before. But now I'm doing it in a much smaller scale...

I believe, metal jewelry is Architecture in a different scale. It involves schematic design, design development, construction, just like the process in Architecture.
I use sterling silver instead of steel, I use nylon coated steel wire instead of steel cable, I use similar constructions like rivets, nuts and bolds or brazing. The only different is no one living inside a necklace or earrings.

I make metal jewelry because... I love doing it, it's my passion. I dream about my design at night, I think about it when I'm putting the baby to bed, when I'm rocking her in the glider, when I'm in the shower, when I'm driving from work, everywhere...

When I walked to my studio, I'm charged with energy, ready to burst. I wanted to construct an idea that I had been playing in my mind. When I sit with my torch or my hammer in my hand, I have goose bumps, filled with excitement then...pfft............I'm in a different world...

Recently my mom asked "What are you doing?"
"I'm making a necklace for you..."

Thursday, February 21, 2008

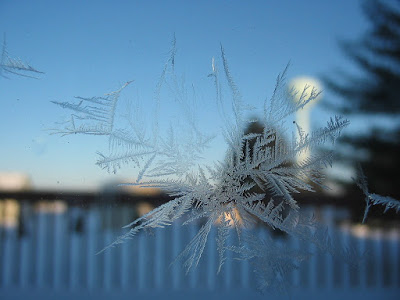
Crystal, crystal on my door...

Something is not quite right with Wisconsin weather. We had rain & snow storm in addition to the wind chill... Of course, black ice are everywhere....
I love taking crystal pictures. No two are alike. There may be more to come.

Wednesday, February 20, 2008

2006 Mixed Media Challenge

I entered this bracelet for 2006 Loose Bead Society Mixed Media Challenge and won a 2nd place.
It's made of reticulated sterling silver sheet, swarvoski cyrstals, czech beads, pearls, garnet and coral. I use wire wrap technique for this bracelet. Bracelet length about 8".
I called it "enchanted forest".
I may be biased but I think it is quiet a nice piece. Don't you agree?

Tuesday, February 19, 2008

Handstamped Name First Communion Bracelet


Still hot from the "oven"...New design.
This year, I make new design for Name Bracelet max 10 characters. Cross charm available for First Communion Bracelets.
It's made of fresh water pearls, swarovski crystal and sterling silver findings, strung on nylon coated steel wire.
Please contact me conny(at)bigib(dot)com for more info or visit my website.

Sunday, February 17, 2008

And the winner is...

Thank you for those who participated in the voting for "Your most memorable Valentine's gift(s) was/were"....
And the winner is ....
FLOWER...
and Chocolate comes in second.
Talking about chocolate... this is what I got this year. A chocolate connoisseur happens to be in the store at the same time when hubby was looking for something for me. Lucky me... I got the best chocolate... hmmm....

Saturday, February 16, 2008

My new avatar...


What do you think? My new Avatar...
Check out SNS (Saturday Night Specials) at my etsy store starting 5 pm EST.

Friday, February 15, 2008

How to clean sterling silver with things you found in your kitchen...

Admit it,... you find the sterling silver jewelry you like, you admire it, you buy it, you wear it,... few months later ( if you do not put it in a sealed box ) it will get tarnished. Now... what to do?

I decided to write this on my blog as customer are asking, how to clean sterling silver?

Well... I found that you have 2 ways. The happy way and kitchen way.

The happy way is you go out to jewelry store and buy sterling silver polishing cloth. Some call it Sunshine polishing cloth... I found one call it Moonshine polishing cloth. What ever they call it, it's basically non-toxic polish impregnated felt cloth. You wipe and clean it and be happy.

The not so happy way is if you have delicate designs on the jewelry and you want to clean between crevices. There are solution out there to clean, which I never use. First, because I don't know what they use. Second, I have kids at home... It's easier for me to go to the kitchen rather than hauling the kids to jewelry store... (which is a nightmare by itself)

So, open your kitchen cabinet. Find baking soda, aluminum foil, shallow casserole or plastic dish and towel.. In the mean time, heat some water. Line the dish with aluminum foil, put the jewelry on top of aluminum foil and pour baking soda on top. Pour the hot water on it, enough to cover jewelry. You will see some chemical reaction (bubbling. It's usually take between 15-30 minutes to clean. Then clean it with soap and clean brush. Remember, it's hot water... do not touch the jewelry.

Here's some pictures I found at ehow...
Good luck...

Disclaimer: This is for informational purposes only. If you are in doubt, please seek professional help. Do NOT use it if your jewelry has some oxidation to show details. I'm not responsible for anything that happen to your jewelry using this method.

Thursday, February 14, 2008

Wednesday, February 13, 2008

Valentine's day story...

"So, how was married life?" one of our friend ask during our first year of marriage...
"Great... it feels like Valentine's day everyday..."
It was then... now if feels like baby's day everyday...

My ex boy friend (who is now my hubby) used to exchanged cards for Valentine. In addition to a card, he gave a wrapped gift which look more like a longer size box on one of Valentine's day. Thinking it's Valentine's day, so my brain was guessing what's inside a box... it looks like a jewelry box... or may be a bracelet or something... I was totally surprise to find out that he gave me.............. an umbrella.

After years of happily married to him, I believe that Valentine's day, birthdays, Mothers day even bad hair day, is actually a celebration of life. No matter what kind of items you give or you get, it's just an expression of love. We're reminded that everyday is a blessing. Everyday is a Valentine's day (or baby day...)
So how was your Valentine's day...

Tuesday, February 12, 2008

YOU COULD WIN THIS....!


You could win this bird nest pendant byMinefull


or this strawberry lampwork earrings compliments of bigib


or banana lampwork earrings compliments of bigib.

HOW?

Write max 3 paragraphs, "Your most memorable Valentine's day story" and send it to me between Feb 13-28, 2008. I will then post it on the blog. On February 29 weekend (It's a leap day, you can't miss it..), we'll vote. The story who got the most vote, wins.

Monday, February 11, 2008

A bag that talks with a chalk...


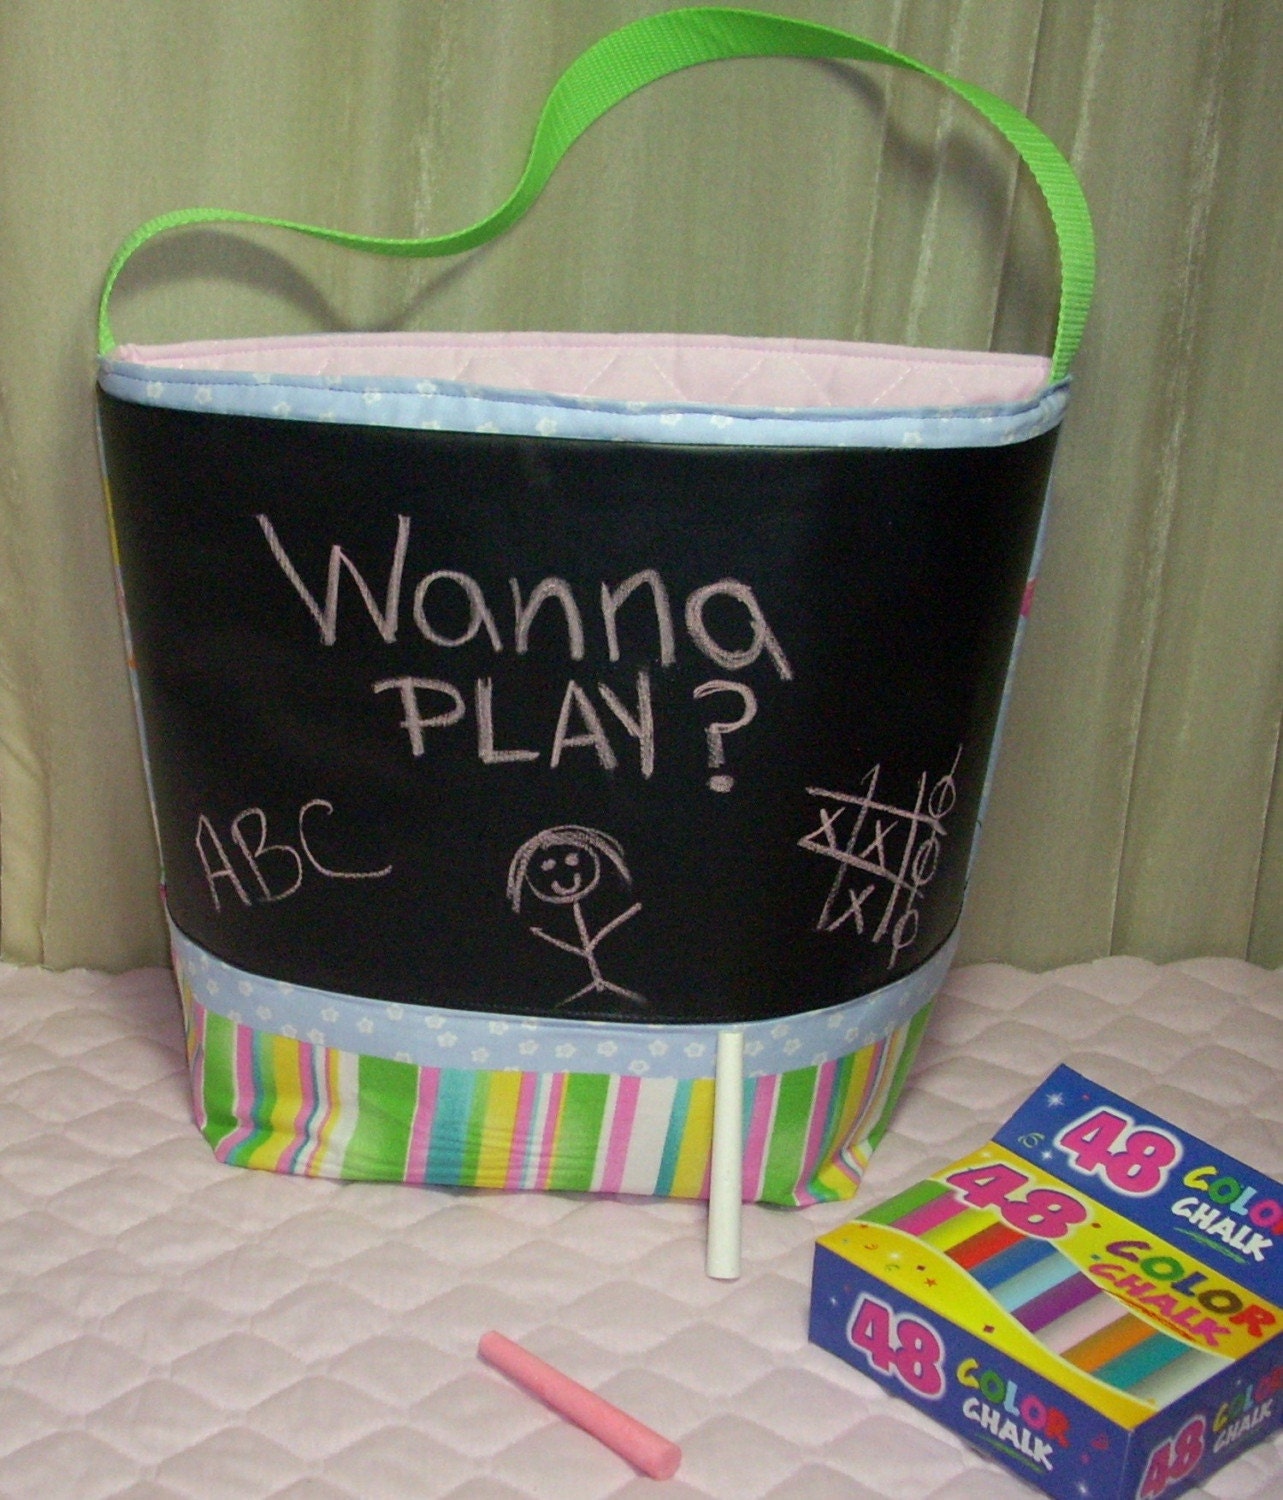
I met Elaine through ETSY. I'm looking for innovative ideas to be featured in my blog. (Read my blog about "The Art of Innovation" last January). Her ChalkBoard Bag really caught my attention.

So I begin by asking her background and why she chose the material to express her creative ideas. Here's what she has to say...

Each of us has some sort of story to tell - either from our heritage, our name, or even something special we do or believe in. The clothes we wear, the jewelry we choose, or even the Handbag we carry make some sort of statement about who we are – kind of a peek inside our personality!

I love to know the special meaning behind people and things....which is kind of how my shop developed! My first attempt at making a handbag was as a favor to a friend who saw a cute purse and was just sure that together, we could make one just like it. I’m sure that purse is long gone now, but the “bug” bit me and I’ve been designing and sewing purses, bags and totes ever since.

My obsession with a “Purse’s Personality” (aka: A Purse-onality) began a few years ago when my mother gave me a book on how to fold Flower Origami. I was fascinated but quickly frustrated when the paper I was using kept tearing. It eventually dawned on me that fabric, of which I had a huge stash, would be so much more durable. After many attempts I became adept at folding and forming fabric flowers. One flower led to two, and eventually to gardens and even birds and other designs. Since most Origami tells a story, it was only natural that my fabric flowers began to tell their own stories. Thus, Story-Bags were born!

A year later I stumbled (literally) across a bolt of Chalk Board Fabric in a small Midwestern town fabric shop called “The Sewing Basket”. I asked what this big bolt of black stuff was, and was told what it was but that they weren’t sure what anyone would actually use it for. I instantly thought of BAGS and PURSES (it must have been that fall I took when I tripped!) A “Chalk Board Bag”! What better way to hear someone’s story than to see what they have to say on their very own chalk board.

Since conception, I have made Chalk Board Bags themed for children, teens, young adults, Moms and even Grandma’s. The concept has really caught on and in 2007 THREADBANGER, an online video podcast with weekly DIY and how to shows every Friday, listed BAGGAVOND's Chalk Board Bag as #5 in their Top 10 DIY Gifts for the Holidays!

PS: If you have innovative ideas and would like to be featured in my blog, please contact me.

Saturday, February 9, 2008

SALE, SALE and more SALE


Happy Saturday. I have sale items on my ETSY store...
Keep your eyes on SNS... Saturday Night Specials (SNS) listings that starts at 5 pm EST.

Friday, February 8, 2008

How to make a hand stamped pendant.


Today is first day I brought my piece to WhimsiKidz... I got 2 orders on the spot...
Whooo hoooo....

My customers were wondering, how did I do it?
Well...let me tell you a bit about it. What I'm going to say next is for informational purposes only. It shows what it takes to make the pendant. It's not intended to replace technical instruction from a licensed instructor. There are safety issues in handling chemical solution use in this process such as Liver of Sulfur. So, please talk to your instructor before you do this.

It's all start from a piece of sterling silver sheet plus tools and finesse. Cut the disc with disc cutter or jeweler's saw.
I use sharpie to decide where I want to put the wordings. Then, come the most tricky part... hand stamping it with steel hand stamping tool on top of steel block. It needs a lot of practice. So, be patient.
I then flattened the sheet with nylon head hammer.

With a center punch and hammer, I marked the hole for jump ring or split ring and and drill the hole. With dapping block and punches, I domed the pendant.

To darken the lettering, I put the pendant in Liver or Sulfur. No, it's not sharpie...!
Once it's all dark, I clean it with steel wool and clean it with soap and brush...voila!

Here's the picture of the tools I use just to make this hand stamped necklace...
A lot of time and effort to make this adorable necklace...


Resources:
I received an email asking where do I get my tools. Well... I got it in my husband's tool box. Since not everyone have access to my hubby's tool box.... you can try eBay, local jewelry supply stores& hardware stores. I go to Home Depot, Menards, Ace, just to wander around and find interesting items. Menards even sell copper/brass sheets, tubes, etc.

As for precious metal, you can try Otto Frei, Metalliferous, Hoover and Strong, Rio Grande, SFJSSantaFe... even sometimes I got supplies at Etsy.
Good luck...

Disclaimer: This is just for your information. I do not endorse any of these sellers.

Thursday, February 7, 2008

Art Find: Ellison Bay Pottery


I met John and Diane from Ellison Bay Pottery at Milwaukee Public Television Art Fair Show in November 2007, down on Townsend and Capital, at the edge of Brookfield and Wauwatosa. They're the nicest couple I've ever met. So, when we were in Door County, we decided to stop and say "Hi"

John and Diane gave us a quick tour of their place. It used to be a fruit barn, turned to be a home and studio. They showed their apple orchard on their back yard
of course they showed us their studio, the area where the fire the pottery and even I took home a piece of their pottery.

Every time when I see Diane or John, I would come home happier and richer... They are so knowledgeable with pottery and even philosophy.

I decided I want to blog her. So we met virtually in the morning. Diane just had steel cut oatmeal and smoothies for breakfast.

Bigib: Is there anything new and interesting?
EBP: We are making new products for this season...different mugs, vases, bowls, so something new to experience. I like to make small dishes I think we all need little dishes for so many reasons I like small vases but recently I have been dreaming of large sculptures for the garden.

Bigib: How is your design process. Do you innovate?
EBP : My ideas come to me completed, so I don't sketch much. John is always tweaking his work, his ideas. He plays with clay regularly in between all the making, to experiment and find changes, or innovations, perhaps?

Bigib: Any new book you're reading?
EBP: I'm reading Making a Literary Life: Advice for Writers and Other Dreamers

I am researching art and why people make what they do. Let's see, I like to read about people's processes. Recently I was reading essays written by writers about their writing process. The usual questions are answered, like where do you get your ideas? And how long does it take to write a book? when do you work? what inspires you? Questions like that. They are similar to the ones people ask us during demonstrations. We make a lot of jokes, you know, to keep it light hearted.

But one thing I see is common amongst people who are artists is that they are driven to do what they do. John goes to the studio to work, because that is his 'day job'. It's what he does. But what inspires him? It's the goal to throw the perfect bowl. Or vase. And since that can't happen, he will never run out of inspiration. There is one more bit of inspiration: he loves making pottery people will use. When they come into the studio and watch him work, they can see that a person made the mug or dish, and it means something to them, too. His finger marks on each piece really personalize it. It matters that people are happy with the pieces they find here.

My process is different. I rarely have an idea when I go into the studio. I spend a lot of time thinking and feeling about just what kind of clay I want to work with. I think about how much time I have in the day or the next few days. Nothing is ever done in a day, you know? I think about the colors I would like to work with, the tools. Sometimes I have an idea of a vase or a dish or tile and then once I start working, something seems to take over. If I fight that, then I am unhappy at the end of the session. I have learned to just let that happen. And I have learned to toss what I hate once I am done with it.

To learn more about EBP, please visit Ellison Bay Pottery website.
or their blog

Wednesday, February 6, 2008

Wisconsin Winter Storm...

It's the biggest storm of the season...!
So, I think it's blog worthy.

We received 12 inch of snow. The deepest part is about 5 soda cans high. The picture just to show you how much we have to shovel.

Hubby went out to shovel at 8 pm. I went out to help at 9. We're done at 10. A good Samaritan with a snow plower stopped by to help. A neighbor across the street, with a snow blower came by to help. I hope this good karma keep on rolling.........

Tuesday, February 5, 2008

Hand stamped Disc Name Necklace Mothers and More Specials...!


It's still HOT!... new piece for this year...
I decided to make custom order hand stamped name necklace. The idea came inspired from Georgia ( see my January blog ). It's made from 1" sterling silver disc, adorned with swarovki bicone birthstone color, strung on 18" venetian box sterling necklace.
To learn more about this necklace, please visit http://www.bigib.com and click moms.

If you are a member of Mothers and More, please let me know. You are eligible for MM special pricing.

Monday, February 4, 2008

Through the eyes of an artist...


I always admire a photographer who could take children pictures. Why? Well, let's see the challenges she or he had to take.

First, the "moving" object. When did you remember a child to follow your instruction? I don't...

Second, the "full of attitude" object. You can not predict how would she do. Will she or he be happy during the session. How to make her happy & capture the perfect moment...

Third,... did I say the perfect moment?
Do you remember the last time when you're holding the camera, look at your baby smiling face and then in that split moment, it's gone.

Fourth... the depth, the value, the story that the picture capture. Anyone, including me, could take hundreds of baby pictures. But I don't think my picture talks as much compare to the one like Sylvia, from Sylvia Laughrin Photography, took one weekend.

She's not only spend the time getting to know the child, she's also very please to work with. I am very happy to get this opportunity working with her and I'm sure, this would be one of the moments we would cherish.

To learn more about her blog, you can visit Sylvia Laughrin Blog


Photographs is copyrighted by Sylvia Laughrin. Used with permission.

Friday, February 1, 2008

How to make sterling silver ball and wire decorated rings...


Happy Friday....!
Here's few of my sterling silver rings I made. All of them are sold except 2nd from the top. Most of them size 7.

It's all started from a piece of sheet. I cut each sheet to about 5 mm by 5.5 cm, depending on the ring size I want to make. It's like a thin plate of sterling. Each individual plate is filed to make sure all sides are soft and straight. Next, I make sterling silver ball by cutting pieces of wire and heat it in charcoal blocks. I then decorate the ring with sterling balls and wire.

The tricky part is soldering the wire and balls to the plate. Because the plate is thicker, I have to heat the plate so the wire won't melt. I use the soldering brick and "raise" the plate a little, then heat the brick instead of the plate and let the heat reflected to the back of the plate. Then after I'm happy with the look, I form it to a ring and solder the ring, buff it, clean it and voila...