Thursday, November 21, 2013

Hand made Holiday decor

Yes you can be creative and make your own Holiday decor. How?

Find a piece of metal sheet, add some creativity and " Voila...."


I love going to hard ware store where I could find a piece of copper sheet and some tools. 

I have a Christmas tree stencil at home that I slightly modify. I added a rectangle on the bottom that would work as the base.
 Using carbon paper, I copy it to the metal piece and cut the outline and leaving the bottom part un cut. I use engraving tool to scar the bottom part of the three where I plan to do a  90 degree fold
 After filing and decorating the item with letter stamping, the item is ready to fold
As for the green patina, I add soak the piece for 30 in a solution of  3 tbs vinegar and 3 tsp salt. Then, I take it out and let it air dry. I add some salt to make the process faster. It takes couple hours to develop the green patina. You can use this to decorate your dining table for your Holiday dinner, or you can put it in your mantle or any place that needs decorating. A simple but impressive project. Wouldn't you agree?

Thursday, October 31, 2013

Wire and beads, yes middle school (you) can make an interesting jewelry for $10 or less.


You only have wire and some of your favorite beads. Can you make a jewelry with it? If you ask me, the blog writer, the answer is YES. It is nice to have store bought toggle or lobster clasp. But if you are on a budget to make a gift for your loved ones, you are in luck because if you take one of IDEA It Lab jewelry program, they will teach you how


Here's how.
1. Buy some quality beads from local bead store like Ju Ju Beads for $6.
2. Black copper wire a spool for $2.
3. Borrow chain nose, flat nose, round nose and cutting pliers from your dad, uncle or anyone you know for free.
4. Your time to read make it.

If you don't know how to do a simple wire loop, you can check out this video. In this bracelet, I added something unique which is squiggly wire. Last but not least is to make a closure. The basic idea is to make an "S" shape or "skinny number 8" where both wire loop connects. You can slightly modify to make an interesting shape. One end needs to have a gap enough for the wire to slip. If you need a step by step instructions, please leave a comment on this blog.

Total cost for this bracelet, $10. The personal value of making it yourself, priceless.


Tuesday, October 22, 2013

Harry Potter inspired lighted wand for Halloween

Joke:
How many engineers does it take to change a light bulb?
Three. One to hold the ladder, one to hold the light bulb, and the third to interpret the Japanese text.

It is funny to think about that joke. I probably could do one myself. "How may engineers does it take to make a pretend Harry Potter inspired wand? Two and an artist. One is an electrical engineer who is figuring out the circuitry, one is an architectural engineer who is figuring out how to make a right sized "wand' for a 12 years old using dowel and plastic container and one emerging artist who decides on the color."

We follow the instructions as in this link.
I takes few hours to work on it. First, we went shopping to Radio Shack. Then, we cut the dowel to the size, drill a hole for the LED light, connect the light, run the cable around the dowel and connect the circuitry. It didn't work. Dad came to the rescue with circuitry and I helped with other part.


Finally, it all come together a couple hours before Halloween party starts. Can you guess what is the character in Harry Potter is she?

Saturday, October 12, 2013

How to make a prism bottle shape? ( not quite but I use this as learning opportunity)

Yes, we do have one.... an almost perfect prism bottle shape... ! How did we do it?
We'll it's a secret.

We went to Mt. Evans last week with a guest. The view was spectacular. Despite  having hard time with altitude sickness, I decided to the short hike to the top of the mountain and so did our daughters. As usual, we would bring extra drinks including a bottled water for every one.

After we got home and cleaned up the car, my younger
daughter found this odd shape bottled water. She was very curios and wondering how did it happen. I have a light bulb moment to use this opportunity to teach her about air density.

As we go to a higher altitude ( Mt Evens is about 14265 ft while Denver is 5280 ft), the air is less dense because the gravity pull the air downward towards the earth. When we opened the bottle at 14265 ft, the air density inside the bottle is the same with the air density at 14265 ft. When we go to a lower altitude where the air density is more, the higher density air pushes the lower density air. But why prism shape? This one I wasn't so sure as we only have one type of bottle water,  but I am guessing because triangle is the very stable shape of other shapes.
And of course, I have to do a little drawings when I talked to my daughter so she could understand easier ( I hope :) I seemed that my answer satisfy her curiosity. What do you think?

Tuesday, October 1, 2013

Braille inspired 'Best Friend" necklace


What a great gift for a best friend....!
DG ordered this gorgeous braille inspired necklace for her best friend AH.
What a lucky friend. Thank you DG for your order.
To learn more about this necklace, please visit bigib.etsy.com

Friday, September 27, 2013

A chance for free stuff from IDEA it Lab

Get a chance to win a mug ...

How?
1. Like IDEA it lab Facebook page. https://www.facebook.com/ideaitlab
2. Share Facebook page to your friends then write "Share it" in the comment page.
3. Tweet it and put a comment " Tweet" on my Facebook.
Increase your chance of winning when you 
4. Sign up for a class at Westminster Parks and recs  http://www.ci.westminster.co.us/Portals/0/Repository/Documents/ParksRec/Activity%20Guides/Fall/Fall13childteenart.pdf ( Page 43 and P45)

OR Prospect Ridge
Academy, http://www.prospectridgeacademy.org/files/_sKDUS_/3c60a1628eab4c233745a49013852ec4/PRA_Metal_Working_Fall_Reg.pdf


Enter by OCTOBER 10, 2013.
Good luck....

Sunday, September 22, 2013

I see a face....tips for cranky kids


We love outdoors and like hiking. But it's not always happen smoothly when we have younger kids. My youngest daughter doesn't like to go hiking or walking. She will started saying her leg hurts and wanted us to carry her. I decided to take this opportunity to make it fun. Usually, I'd ask her to be a line leader. Then, I would play "I spy" with her. Her assignment is to fine faces in unusual places. From my past experience, this is a good way to train your visual ability. I help to train you brain to see something that your eye won't see.

Here are some "I spy" pictures we found during our walk at Memorial Park at Co. Springs. Can you find other faces in your area? Send your pictures to ideaitlab.com facebook for a chance to win a prize.

Friday, September 13, 2013

Hoover craft, a science activity at home

The school is closed today. The kids are home and they started asking to watch TV because they are bored. I remember I have a science kit I got at the RAFT in Denver. I originally plan to use this for my troop, but I thought it's a good excuse to try it before doing it in front of 20 girls. 

 All you need is glue gun, thumb tack, old cd, sport bottle top, balloon, index card. The instruction said to make 1 holes on the top of the sport bottle cap. I decided to skip that and use the original bottle openings instead. I glue gun the sides to make sure it's air tight and bottom of the bottle cap to the cd.
 Then we blow the balloon and twist it and put the balloon on the sport bottle cap. We put a "collar" from index card around the balloon to keep it straight up. And we un twist the balloon
As the air blow out from the sports bottle cap, it slightly lifted the CD. It really moves by itself. When I took these picture, the balloon was coming towards me.

It's a good opportunity to teach about Bernoulli affect. The kids loved it, I enjoyed it. And when I told the kids it's TV time, they refused. I thought I definitely should share this in my blog...


Thursday, September 12, 2013

Short term profit, instant gratification, greed...

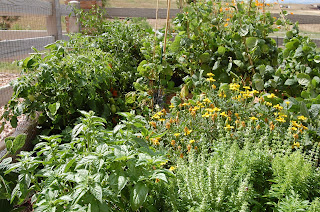
So, what is the title has to do with the veggie garden picture?  Well.. the inspiration started here.
We started a new veggie garden in early June. We planted herbs, veggie and flower. Not until end of August or so, it started giving us a good crop. So, I have been sharing some to my next door neighbor. Not because I don't want it but it's because I want to teach our daughter the spirit of sharing and taking just enough.
I believe we are now living in a society where we only see short term goal. Wall Street always predict about next quarter profit. Children (or sometimes adults) are so used to with instant gratification. Greed are always lurking.

Like my experience with one of my girl scout troop... we had limited snacks to share with 20 girls and I noticed one of the girls scoop double than others.  As a leader, I reminded her that we have 18 other kids who were hungry and would like some snacks too. And I got the answer that she was doing it because she could.

So, what does veggie garden has to do with this? Veggie garden teaches there is no such thing as instant gratification. It took about 8 weeks and a lot of TLC before it started producing. And our veggie garden produces more than we need. It is up to us to take what we need and share with the rest. It also teaches us about planning when cold weather arrives. And we can give back what the earth has given us by composting.

Sharing a zucchini or couple tomatoes may not fill everyone's tummy, but there is something about sharing that makes my heart filled.

I think as a parents, we have to start showing the basics to our children, like compassion, sharing and be happy with what we have because we have enough.

Wouldn't you agree?

Monday, September 2, 2013

Hot air balloon... why did it fly?

This past Labor day weekend, we went to see hot air balloon at Colorado Springs. They did mass ascension at around 7 from Memorial Park, Co Springs. The view were spectacular. We saw about a total of 80 balloons. Two of them have odd shape like a smiley sun shape and a fish while most of them are round balloon shape.
Of course my curios daughter asked me how did they fly? I got an aha moment to use this opportunity to talk about a little science about it. We saw a balloon started from a flat shape. Then the pilot blew air with a big fan until it formed flat balloon shape. Then, he started heating the air. Hot air is lighter than cold air... So when he heated the air, the  hot air will go up up. Since the balloon was holding all the hot air, it will eventually lift the balloon up.

If you see at the picture, the balloon is so much bigger than the basket itself. My daughter didn't like to hear the noise when the pilot was heating the air but she's surely enjoy to see a lot of balloon goes up in a cool morning at Colorado Springs.

Monday, August 12, 2013

Who is Mardiah

I recently went to Indonesia and met my old friend, Diah. She's my friend at architecture school.

She uses fabric as her medium. Like the one in this picture, she's using sequins to add color and design in a piece of fabric which eventually will become part of a dress.
Since we both "architect" and we have similar "wave length", we decided to team up to add some themed collections.

Diah made her own tool. She usually works with rayon, silk, cotton. Her own home made tools, resit dye process and her architecture background made her design so unique. You could see the lines and geometric shapes in her design.  to design her fabric. 

What do you think?

I know what I did this summer... I taught "idea-it" programs at Westminster Parks and Recs.


This has been a fun Summer for me. I did something new this year. I taught several idea-it classes at


Westminster Parks and Recs. The goal is to get kids excited about design, engineering and art. Using engineering process, they designed and build a model of an object. This was a brige-it project where students designed a bridge for Mr. and Mrs. Corn to safely cross a 3 ft span.


Students drew their design plan, build it, test it, fix it and test it again to meet the "client" needs.
With a background in Architectural Engineering, this is a fun way for me to spend summer. Wouldn't you agree?

Can't get enough idea-it? Watch for my Fall Schedule at Westminster Parks and Recs and the surrounding Broomfield County. Hope to see you then..?


Monday, July 29, 2013

How Bigib scarf or jewelry can jazz up your simple black dress

I have this little black dress, which is one of my favorites. It's simple and yet comfortable.


I love this because it's easy to wear for going to work, church or even party. I decided to wear it to one of my meetings. As usual, I was rushing, not sure what to wear, so I grab my little black dress. It looks so plain.

 I was deciding between wearing my dress with a jewelry or scarf. Since this is the first interview and I want to show a more classic style, I decided to wear a red / black batik silk scarf. Plus if the room is too col, I can always use the scarf help warm myself a bit. .

I think both looks good. I'd wear the silver jewelry and the matching earrings for a party.
What do you think?

Monday, July 22, 2013

Giant bubble wands summer fun

What makes this girl so excited? The first big, giant, humongous bubbles she's ever seen !!!
Yes, it is Summer and of course my kids started to say "I'm bored".
I decided to try to make giant bubble wands.

It's made of two dowels, eye hooks, string, washers.
 First, you have to drill both dowels and twist the eye hooks tight
Add washers/nuts on the string.  I use cotton/poly 20 lbs string at Home Depot. Even my youngest can help make the wand.
 Then tie both ends and it's ready to go. I searched home made bubble recipes and I tested a couple. I also tested a store bought bubble. We found out all of them are good
It's simple project to do that I think will last all summer fun. Wouldn't you agree?

Monday, July 15, 2013

Silk handmade scarves by Diah at Bigib

Bigib is now teaming up with Mardiah Faraz. Diah,  is her old friend at college whom she met in her last trip to Asia. Diah has been making hand made scarves in the past 10 years. So when I told her I make jewelry, we decided to team up. We both graduated from architecture school so we have similar "wave length" in design.

 This is one of our favorite items. It's  "lines and circles" them hand made silk scarf. The size is 90"x40", which is long enough to make infinity scarf.
Or may be a double knot scarf?
And we can pair this to "lines and circles" hand made earrings


So, what do you think about same theme scarf and earrings? To learn more about this, please visit bigib.etsy.com

Monday, July 8, 2013

Batik, a resist painting method to color fabric

I was inspired with a handmade scarf my dear friend of mine, Diah, made. I decided when I get a chance, I'd like to learn about fabric, especially resist dying or Batik.

So when I was in Indonesia, I went to Indonesian textile museum in Jakarta and took a class about batik.

It's started with a design. We have a piece of 100% cotton fabric and some designs we can choose from their collections. Then, using a light table, we traced the design on to the fabric. Then using "malam" (was) and canting, we traced the design on the fabric. The tricky part is to get used to holding the canting the right way. You are suppose to hold it at an angle. If it's too steep, the hot wax can spill off and got your hand. If its too steep the opposite way, you'll get "blob" instead of a nice design.

Yes, I've made some blobs and also spill hot was on to my hand. After several tries, I think I got a hang of it. Now it's just making sure that the canting will follow your design nice and smoothly.

Here is the picture of my first piece. I think it is pretty good for a first timer. We made a small bandana.. or may be a small handkerchief. And when I'm happy with it, I take it to the coloring station where Pak Warso is waiting for me with his elbow length gloves.


They have 4 huge container filled with color. I chose blue. He then dipped the piece in a special agent, then color then he rinse it with water and for the final touch, he boiled the piece to remove the wax.


And here is my first and final masterpiece. I should have signed my name but I forgot. We spent about 3 hours to finish up a project. I think it is addicting because I felt I'm ready for my second project. 

What do you think?

Wednesday, July 3, 2013

Sepa Island trip at Pulau Seribu Thousand Island Indonesia


We went to Sepa Island, part of Thousand Island in Indonesia. It's located in North of Jakarta. There are several tour operators located in Jalan Lodan near Marina Ancol.
We learned we could make a reservation and put a 50%  down payment to secure our spot. or we could also come on the day with no guarantee spot.
We choose the later ones. Originally, we wanted to go to Pulau Kotok. Since we have no spots for that, we decided to go to Sepa Island


The cost is about $80/ person, including trip and lunch. The boat would leave Marina at 8 and would arrive at about 9:30 am. The boat will pick us up at 2 pm. 
We plan to swim around, do snorkeling around the island to see coral reef. 

When we arrived at the island, there are some options to ride a boat for extra charges. About $20 to rent a boat to get to an atoll island and $30 to rent snorkeling equipment.
We only have swimming goggles... we decided to give a try. Geared with swimming goggle, swimming shoes (highly recommended as there are coral and sea urchins), we swam around the beach. I was hoping to find colorful corals but all looks brown, grey or black. I'm not sure if that's how it's suppose to be but it looks very unattractive to me. Besides, there are floating plastic bottle, plastic glasses that ruin the nature. 

There are some "naughty" fish that keeps nibbling on our legs. The lunch is just OK. A local food presented pretty decent. There are tents to helps protects from the heat. Perhaps, the best local findings is a "Biawak"(small Komodo dragon) that was walking around "freely". They ran away when they saw us.

Is it worth $80/person for the trip? I thought it was just OK. I do wish they have a better beach.

Friday, June 7, 2013

Braille inspired copper bookmark


Did I tell you I will be making more Braille inspired projects?
How about a Braille bookmarks? It's made of copper sheet, hand stamped to create Braille. This one says" Only you can control your future. Dr Seuss"  


I then heat patina the piece to create some color. I also use a unique method to create a pattern. In addition to beautiful, I think is also functional.
What do you think?


Saturday, May 25, 2013

Braille inspired copper necklace


It's been years ago when I visited my cousin in MA. His girl friend, MJ, was a teacher for the school of the blind. She talked how different to teach the blinds and she shared braille cards to me. I love touching it as the card is so soft with "dimple" on it.


As I was sitting in my studio, going through my books for some inspiration, I found this card. My heart jumped as I have been thinking about designing a piece from it and now this is my chance.

The necklace is make of 3/8" wide copper sheet. The length varies depending on the characters. Picture shown is "Abigail" and "Gaby". Abigail is about 2 3/8" long. I think I should not go longer than that or otherwise it will poke someone. I can do patina or natural finish.

I have some more ideas for Braille inspired piece...
and of course, braille inspired classes is coming up soon. If you would like me to teach at your school, please contact me conny(at)bigib(dot)com